
In this tutorial we’ll take a look at RIPng then configure it in Packet Tracer.
About RIPng
The primary features of RIPng are the same as they were in IPv4: It’s still a distance-vector protocol, has a maximum hop count of 15 and uses split horizon, poison reverse and other loop avoidance mechanisms.
RIPng still uses multicast to send routing updates, but in IPv6, it uses FF02::9 for the multicast traffic. Comparing this to the multicast of RIPv2 , 224.0.0.9 ,you can note a 9 still at the end in the new IPv6 multicast address.
But there as also some differences between the two versions. One the most notable changes with RIPng (and all other IPv6 routing protocols), is that you enable network advertisement from interface configuration mode of a router instead of using network command in the global configuration mode.
In the interface configuration mode of a router, you simply need to type:
Router(config-if)#ipv6 rip 10 enable
The 10 that you see in the command is a number that identifies the process of RIPng that’s running. Just by typing this command, a new RIPng process is started (enabled) for you so you don’t have to go to global configuration mode to enable the process.
Let’s now configure RIPng in Packet Tracer.
1. Build the network topology.
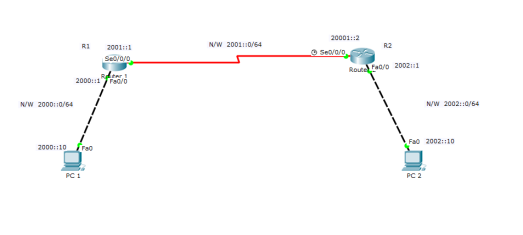
2.Configure IPv6 addresses on the PCs and on router interfaces.
Always remember to enable IPv6 routing in a router from the global config mode using ipv6 unicast-routing command before you start working with IPv6.
Router 1
R1(config)#
R1(config)#ipv6 unicast-routing

R1(config)#int fa 0/0
R1(config-if)#ipv6 add 2000::1/64
R1(config-if)#no shut
R1(config-if)#
R1(config-if)#int serial 0/0/0
R1(config-if)#ipv6 add 2001::1/64
R1(config-if)#no shut
Router 2
R2(config)#
R2(config)#ipv6 unicast-routing

R2(config-if)#int serial 0/0/0
R2(config-if)#ipv6 add 2001::2/64
R2(config-if)#no shut
R2(config-if)#
R2(config)#int fa0/0
R2(config-if)#ipv6 add 2002::1/64
R2(config-if)#no shut
Then do IP configuration on PCs:
PC1: IPv6 add 2000::10 Default gateway 2000::1
PC2: IPv6 add 2002::10 Default gateway 2002::1
3. Configure RIPng on the routers.
We’ll do this simply by enabling RIPng on the interfaces.
Router 1
R1(config)#int fa0/0
R1(config-if)#ipv6 RIP 10 enable
R1(config-if)#
R1(config-if)#int serial 0/0/0
R1(config-if)#ipv6 RIP 10 enable
Router 2
R2(config)#int fa0/0
R2(config-if)#ipv6 rip 20 enable
R2(config-if)#
R2(config-if)#int serial 0/0/0
R2(config-if)#ipv6 rip 20 enable
That’s all for configuration.
4.Now verify RIPng configuration
First, we’ll verify whether R1 has learnt the route to the 2002::0/64 network using the show ipv6 route command:
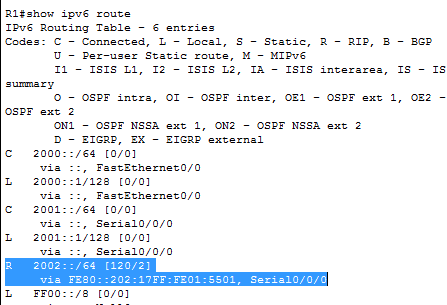
In the above picture, R indicates an IPv6 route learnt through RIPng.
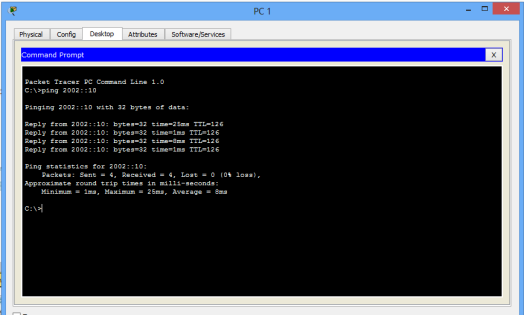
Next, ping PC2 from PC1. Ping should be successful.
Hope you found this tutorial helpful. Your comment will help improve this article.
Success! Success!
You may also like to read:

This paragraph gives clear idea for the new viewers of blogging, that
truly how to do running a blog.
LikeLike
There is even the simpler way to achieve the goal of routing in this topology. Namely, you don’t have to address the point-to-point router interfaces with global addresses. You can use link-local addresses as well.
LikeLike