
Hello and welcome! In this tutorial, we’ll do an overview of EIGRP and see how to configure it on a Cisco Router in Packet Tracer.
Overview of EIGRP
Enhanced Interior Gateway Routing Protocol (EIGRP) is an hybrid routing protocol possessing characteristics of both distance-vector and and link-state routing protocols. It was a proprietary Cisco routing protocol but Cisco decided to convert it to an open standard in 2013.
Let’s see some key features that makes EIGRP helpful especially for large and complex networks.
- It supports both IPv4 and IPv6
- Supports classless routing and VLSM (Variable Length Subnet Masking)
- Allows route summarization on any router in the network
- Supports load balancing
- Supports MD5 authentication
EIGRP uses a multicast address of 224.0.0.10 and uses Cisco’s Reliable Transport Protocol (RTP) to send messages to the multicast address. It has a default administrative distance of 90, which is less than the default administrative distances of RIP and OSPF, implying that EIGRP routes will be preferred over RIP and OSPF routes.
For EIGRP, routing metric is calculated using bandwidth, delay, reliability and load.
EIGRP Neighborhood establishment
Before exchanging routing information, routers that run EIGRP must first become neighbors. EIGRP Routers send hello packets to the multicast address of 224.0.0.10 to dynamically discover neighbors on directly attached networks.
In order for routers in a network to become neighbors:
- They must be configured with the same ASN (Autonomous System Number). An autonomous system number is a group of EIGRP-enabled routers that should become EIGRP neighbors and exchange routes.
- The routers must also be using the same parameters to calculate metric.These parameters are called K values (components of metric). Just as we’ve seen, the K values are bandwidth,delay,reliability and load.
By default, the only parameters used to calculate EIGRP metric are bandwith and delay.The other two parameters are disabled by default ; so the network admin has to enable them on the router when desired for use.
EIGRP tables Explained
Each EIGRP router uses three tables to store routing information.
Neighborhood table -which stores information about EIGRP neighbors. Remember we said that routers need first to become neighbors before they can exchange routing information. A neighborhood table is thus used to keep neighborhood information such as the IP address of the neighbor, the local interface on which hellos were received , the hold down timer and others neighbor information.
Topology table– stores routing information learnt from neighbor routing tables. Every EIGRP route inside the autonomous system is stored here.The topology table also holds the metrics for each of the listed EIGRP routes, the feasible successor and the successor routes.
Routing table -Stores only the best routes to reach a remote network.
EIGRP configuration on a Router
Now we’re ready to configure EIGRP. It is configured using these commands:
1. (config) router eigrp ASN – This command starts EIGRP on the router.In order to become EIGRP neighbors,routers must be configured with the same AS number.You can use any number between 1 and 65,535
2.(config-router) network SUBNET [WILCARD_MASK]. This command advertises a network directly connected to the router to other routers.
Let’s configure this on Packet tracer
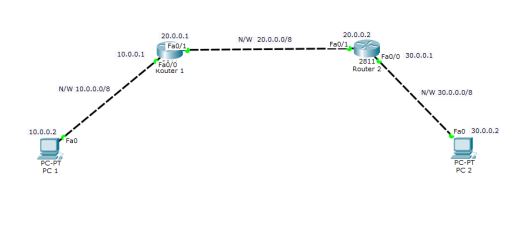
1.Build the network topology as shown below.
2. Do IP configurations on the PCs and the routers
Router1
R1(config)#
R1(config)#int fa0/0
R1(config-if)#ip add 10.0.0.1  255.0.0.0
R1(config-if)#no shut

R1(config-if)#int fa0/1
R1(config-if)#ip address 20.0.0.1  255.0.0.0
R1(config-if)#no shut
Router 2
R2(config)#
R2(config)#int fa0/0
R2(config-if)#ip add 30.0.0.1 255.0.0.0
R2(config-if)#no shutdown

R2(config-if)#int fa0/1
R2(config-if)#ip address 20.0.0.2 255.0.0.0
R2(config-if)#no shutdown
PC IP configuration
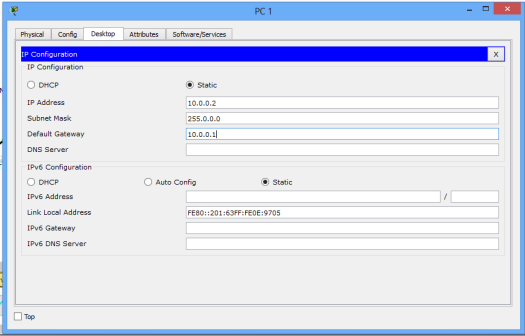
Click on PC ->Desktop->IP configuration. Here, fill in static IP addresses.
PC1 IP address: 10.0.0.2 Subnet mask: 255.0.0.0 Default Gateway 10.0.0.1
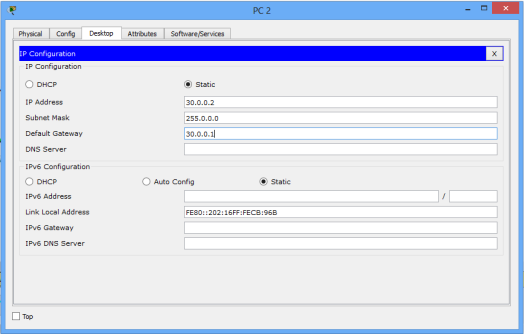
PC2 IP address: 30.0.0.2 Subnet mask: 255.0.0.0 Default Gateway 30.0.0.1
PC1
PC2
3. Configure EIGRP on the routers. Remember to use the same ASN number on both routers. Once configured, the routers become EIGRP neighbors.
Router 1:
R1(config)#
R1(config)#router eigrp 1
R1(config-router)#network 10.0.0.0
R1(config-router)#network 20.0.0.0
Router 2:
R2(config)#
R2(config)#router eigrp 1
R2(config-router)#network 20.0.0.0
R2(config-router)#network 30.0.0.0
You can see that we’re simply enabling EIGRP on the routers, then advertising networks directly connected to each router. Simple!
4. Now verify EIGRP configuration.
First let’s verify EIGRP neighborhood relationship of the routers.
Lets do this on Router 1
R1#
R1#show ip eigrp neighbors
Then observe the neighborhood:
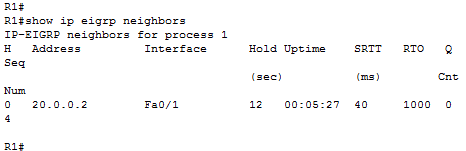
In the picture above,you can see that R1 has a single neighbor with the IP address of 20.0.0.2
Secondly, we’ll verify whether R1 has received a route to reach the 30.0.0.0/8 network. We can use the show ip route eigrp command.

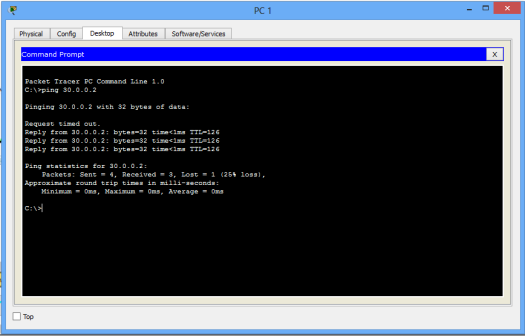
Lastly, let’s ping PC2 from PC1. Ping should succeed because. R1 has learnt the route to 30.0.0.0/8 through EIGRP as denoted by letter D.
Try also to ping PC1 from PC2. Ping should work.
That’s it! Hope you found this tutorial helpful. Share your comments in the comments section to help improve this article.
You may also like to read:
- OSPF configuration in Packet Tracer
- RIP configuration in Packet Tracer
- EIGRP for IPv6 (EIGRPv6) configuration in Packet Tracer
- OSPF for IPv6 (OSPFv3) configuration in Packet Tracer
- Configuring RIP next generation(RIPng) in Packet Tracer

First and formost, Thank you very much. this tutorial that you write it down was very helpful and useful especialy for me individual, i am ealy looking forward to your more and more tutorials
LikeLike