
Hello and welcome! In this tutorial, we’ll have an overview of OSPFv3 then see how to configure it in Packet Tracer.
About OSPFv3
OSPFv3 is the OSPF version for IPv6. It’s primary features are still similar to those of OSPFv2 used with IPv4 networks.
Just as in IPv4, OSPFv3 still remains to be a link-state routing protocol that divides an entire internetwork or autonomous system into multiple areas. OSPFv3 still uses a multicast traffic to send its routing updates and acknowledgements, with a multicast address of FF02::5 for OSPF routers and FF02::6 for OSPF- designated routers.These addresses are a replacement of 224.0.0.5 and 224.0.0.6 respectfully as used in IPv4.
Even so, OSPFv3 comes with some changes, one of them being that unlike IPV4 routing versions, OSPFv3 (just like other IPv6 routing protocols), is enabled from the interface configuration mode of a router.
Let’s now configure OSPFv3 in Packet Tracer
1. Build the network topology.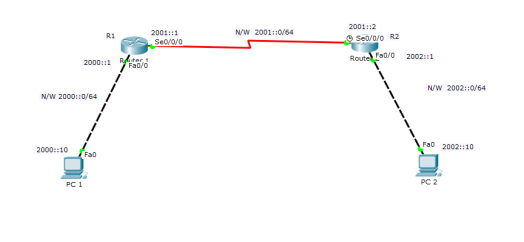
2. Configure IPv6 addresses on the PCs and the routers
Important: Always remember to enable IPv6 routing on a router using ipv6 unicast-routing command. That’s the starting point before you can work with IPv6 addresses on a router.
Router 1
R1(config)#
R1(config)#ipv6 unicast-routing

R1(config)#int fa0/0
R1(config-if)#ipv6 add 2000::1/64
R1(config-if)#no shut
R1(config-if)#
R1(config-if)#int serial 0/0/0
R1(config-if)#ipv6 add 2001::1/64
R1(config-if)#no shut
Router 2
R2(config)#
R2(config)#ipv6 unicast-routing

R2(config)#int serial 0/0/0
R2(config-if)#ipv6 add 2001::2/64
R2(config-if)#no shut
R2(config-if)#
R2(config-if)#int fa0/0
R2(config-if)#ipv6 add 2002::1/64
R2(config-if)#no shut
IPv6 configuration on PCs
PC1 IPv6 address: 2000::10 Default gateway 2000::1
PC2 IPv6 address: 2002::10 Default gateway 2002::1
The next (and the major) thing we’ll do is to:
3. Configure OSPFv3 on the routers.
To do this, we’ll simply:
- Create an OSPFv3 process using ipv6 router ospf PROCESS_ID command from the global config mode. This is just the same way we created an OSPF process in IPv4. We’ll also add router ID using router-id ID command from the router configuration mode.
For instance,
R1(config)#ipv6 router ospf 1
- Add router interfaces to the OSPFv3 process just created. This will activate(enable) route advertisement on the interfaces. We’ll use the ipv6 ospf PROCESS_ID area AREA_ID command on interface configuration mode.
For instance,
Router(config-if)# ipv6 ospf 10 area 0
The number 10 is the OSPF process ID, 0 is the area ID.
The configuration is somewhat easier than with IPV4. Not so?
Now let’s fully configure OSPFv3 on:
Router 1
R1(config)#
R1(config)#ipv6 router ospf 1
R1(config-rtr)#router-id 1.1.1.1
R1(config-rtr)#exit

R1(config)#int fa0/0
R1(config-if)#ipv6 ospf 1 area 0
R1(config-if)#
R1(config-if)#int serial 0/0/0
R1(config-if)#ipv6 ospf 1 area 0
Router 2
R2(config)#
R2(config)#ipv6 router ospf 1
R2(config-rtr)#router-id 2.2.2.2
R2(config-rtr)#exit
R2(config)#
R2(config)#int fa0/0
R2(config-if)#ipv6 ospf 1 area 0
R2(config-if)#
R2(config-if)#int serial 0/0/0
R2(config-if)#ipv6 ospf 1 area 0
So its all about creating an OSPFv3 process then enabling (activating) the process on a particular interface! That’s all we have do for configuration!
4. Now let’s verify the OSPFv3 configuration
Let’s see whether R1 has learnt about 2002::0/64 network using show ipv6 route command.
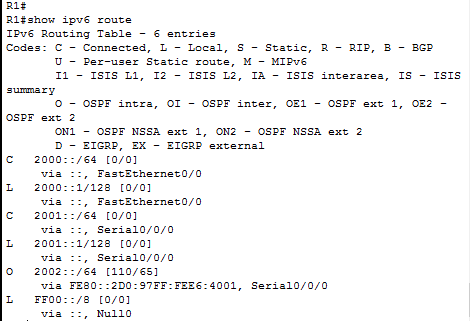
Sure! R1 has learnt the route using OSPF as indicated by letter O.
To verify further that IPv6 addressing is indeed working:
Ping PC2 from PC1.
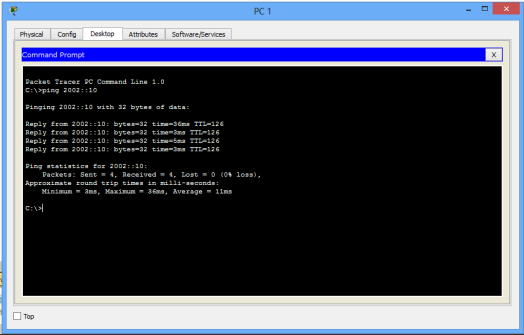
Ping should succeed.
And just as usual, Success! Success!
Hope you found this tutorial helpful. Comment to help improve it. Do also like.
You may also like to look at:
- EIGRPv6 configuration in Packet Tracer
- RIPng configuration in Packet Tracer
- Basic IPv6 concepts and configuration in Packet Tracer
- Configuring DHCPv6 (both stateless and stateful) in Packet Tracer.
- IPv6 tunneling over an IPv4 network in Packet Tracer

Does your blog have a contact page? I’m having trouble locating it but, I’d like to send you an e-mail.
I’ve got some recommendations for your blog you might be interested in hearing.
Either way, great site and I look forward to seeing it develop over time.
LikeLike
When I initially commented I clicked the “Notify me when new comments are added” checkbox and now
each time a comment is added I get four emails with the same comment.
Is there any way you can remove people from that service?
Thanks a lot!
LikeLike
https://takipavm.com/blog/instagram-takipci-satin-alinan-hesap-nasil-anlasilir/
LikeLike
https://takipcisepette.com/blog/gercek-takipci-sayisini-ogrenme/
LikeLike
which router you use in this?
LikeLike